Hey there.
You came here to learn about some simple ways to optimize your images for WordPress?
Let’s get to it.
Before we jump in, let me give you an overview of what topics I am going to tackle:
- What is Image Optimization?
- What are the benefits of Image Optimization?
- How do you optimize Images for Web Performance?
4 Simple Ways To Optimize Images For WordPress
1. What is Image Optimization?
Do you know that images account for the most occupied space on a website and therefore are the most often downloaded bytes on a page?
Are you using a lot of images on your website and in your blog posts?
Then image optimization is a must for you to ensure a fast page speed and a good user experience.
But what exactly does Image Optimization mean?
Image Optimization is the process of reducing the file size of your images as much as possible but at the same time, delivering them in high quality, right format, size, and resolution.
Example of resizing an image to the correct dimension:


2. What are the benefits of Image Optimization?
There are 3 main benefits to optimizing your images:
- Faster site speed
- Search Engine Optimization (SEO)
- Less Bandwith
2.1 Site Speed
Under site speed, we usually understand the amount of time it takes a website to fully load.
There are a few tools with which you can measure your site speed, e.g. GTmetrix, Pingdom, and Google Page Insights.
Many factors play a role in fast page speed:
- what hosting provider you are using?
- what type of theme you are using?
- are you using a Content Delivery Network?
- what type of caching plugin are you using?
- how are you optimizing your images?
Images are an important piece of content on most websites, and without optimization can slow down your site significantly.
You probably know this already, but most users expect a website to load as fast as possible.
5 Simple Ways to Improve Website Speed (2022 Guide)
To give you a little more perspective:
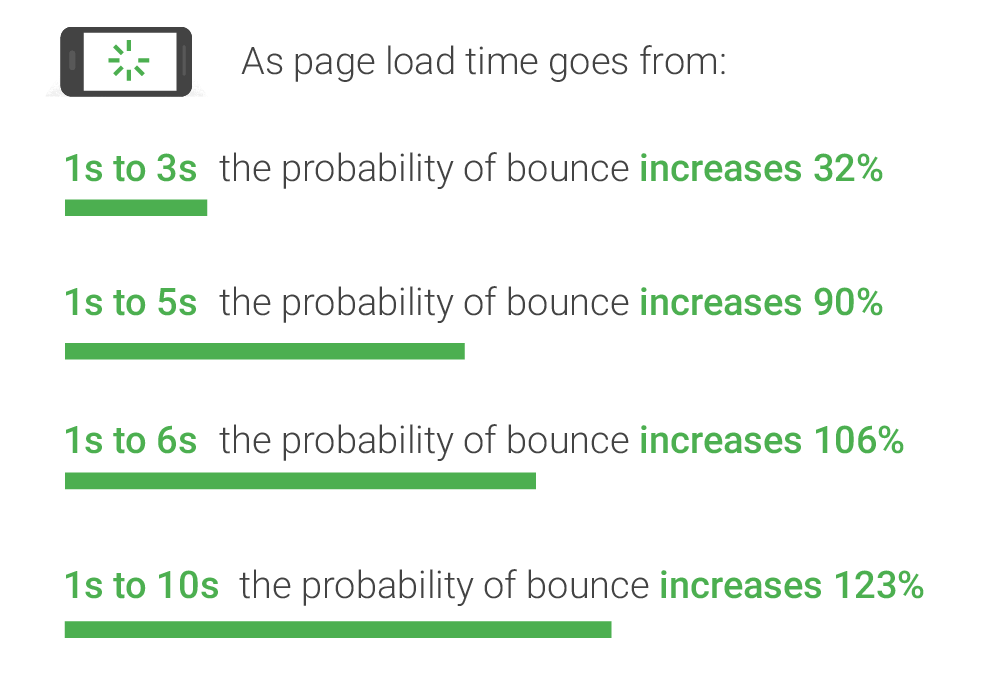
Image optimization will ensure you fast page loading times and an improved user experience.
2.2 Search Engine Optimization (SEO)
Besides a fast page speed, image optimization will improve your SEO scores.
High-quality images, correctly optimized, can improve the quality of your site immensely and encourage more engagement with your users.
What do we understand under a “well-optimized” image?
It’s a combination of the following:
- Formatting the image
- Setting a proper title
- Having a title text
- Having an alt text
All of this goes into your Image SEO.
Not only will this give the search engines an idea of what your website is all about, but it will also make it easier for people to find it.
A website with well-written content, and good-quality & optimized images gives you a good chance to have a high ranking on Google, earn shares on Social Media, and maybe even earn backlinks from others.
All of these factors are important because they contribute to your site’s domain authority and will help you to increase traffic.
At the same time, you should be aware that image optimization alone is not a guarantee for fast site speed performance & great user experience.
2.3 User Experience
The last benefit of Image Optimization is the enhancement of the user experience.
With the help of image compression, you are allowing the user to have a fast page speed experience without reducing the image quality.
By giving each image a proper title and alt text you will ensure that users who visit your site via search engines (most likely Google) get exactly the results they were looking for.
If you look from the “technical side” – you are feeding the search engines information for them to properly “understand” what your site is all about.
By optimizing your images you are not only improving your SEO but also improving the user experience on your website.
“You get two birds with one stone”.
3. How do you optimize Images for Web Performance?
Let’s jump into the process and learn what you need to do to optimize your images.
There are quite a few different factors that we are going to discuss:
- Scanning for unoptimized images
- Formats you should use for your images
- Different compression types
- Tools for image compression and optimization
- Serving your images in a WebP format
3.1 Scanning for Unoptimized Images
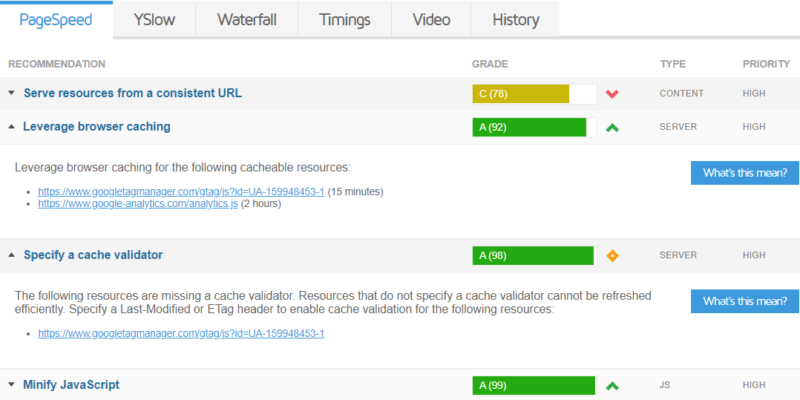
The best way to identify if your website has unoptimized images is to run it through GTmetrix.
GTmetrix doesn’t only supply you with your website’s performance score but also gives you detailed information about what you actually need to optimize.
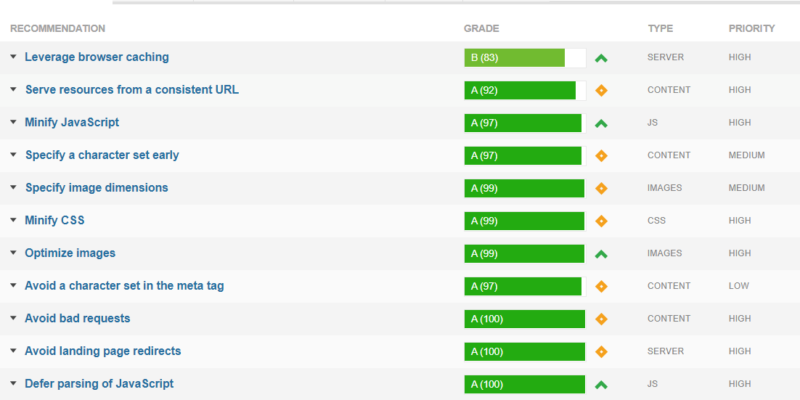
Each of the points mentioned in the “recommendation” will give you a breakdown of what exactly needs to be optimized.
It definitely makes your life a little bit easier.
Here is an example how what the suggestions looked like for Bestbloggingresources.com:
3.2 Image Formats & Compression Types
There are three popular image formats:
- JPEG or JPG
- PNG
- GIF
3.2.1 JPEG
JPEG or also known as JPG is short for Joint Photographic Experts Group.
JPEG images are widely-spread and next to PNG one of the most used formats to save images.
They are well suited for high compression levels and are perfect for photographs because they can display millions of colors.
When we are trying to compress images, “lossy compression” is one of the most common settings that plugins or caching tools use.
JPEG images support this setting but the result after the optimization has a slight drop in image quality.
It will be visible, especially in bigger images.
Of course, you can always control the level of compression to ensure the best quality of your images but it might slow down your performance.
3.2.2 PNG
The PNG image format, next to JPEG, is one of the widely-spread formats for images. It stands for Portable Network Graphics.
Because PNG images can display millions of colors, they are perfect for screenshots, and infographics. etc.
As mentioned above, “lossy compression” is one of the most common settings that plugins use to compress the images.
Another common setting is the “lossless compression” which is supported by PNG.
During it, no data is lost which allows PNG images to remain crisp and sharp compared to JPEG images after compression.
Make sure to save & upload your images in the PNG format to your WordPress site, especially if your website has a big focus on images.
3.2.3 GIF
The biggest difference between JPEG, PNG & GIF formats is that the GIF format supports both animated and static images.
Many animations that are used on Social Media are GIF images.
At the same time, GIF images only support 256 colors which makes them unsuitable for illustrations with a lot of color gradients.
Just as the PNG images, GIF uses “lossless compression” to reduce file size without losing visual quality.
The decision of which formats you should use depends 100% on your needs.
As mentioned above, PNG images are ideal for screenshots, infographics, or maybe even your logo.
JPEG is great for small images on your website – like thumbnails.
GIF images are ideal for animations or short videos if you want to avoid uploading complete videos on your website.
3.3 Tools & Plugins for Image Compression And Optimization
To optimize your images you can use plugins like Imagify, ShortPixel, or Smush which are all free.
The only hick-up with free image optimization plugins is that they have a monthly limit for how many images you can optimize.
After hitting the limit, you have to wait till next month until your credits are restored or pay money for the image plugin, that you are using.
An option that I prefer instead of using multiple plugins is to buy one plugin that does it all, Swift Performance.
After downloading and installing the image optimization plugin of your choosing, you will need to follow the initial instructions to set up the plugin.
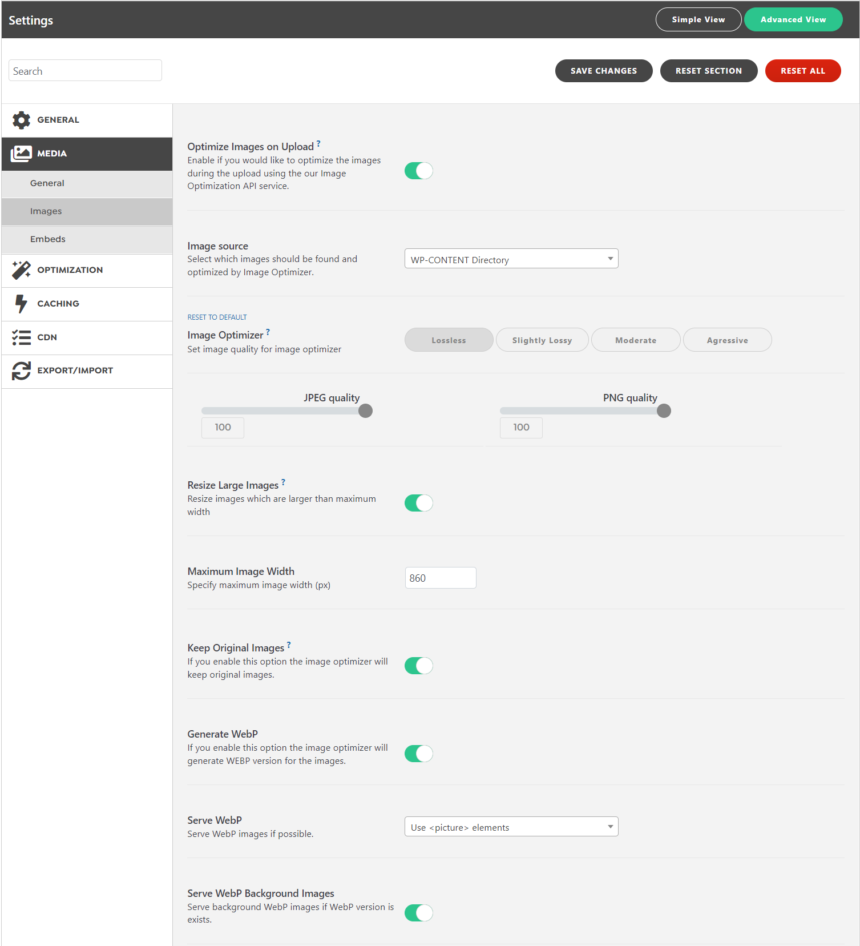
The following settings will be important for optimizing your images:
Step 1:
The main setting you want to adjust is the compression level
of the images.
Step 2:
Swift Performance offers the options “lossless“, “slightly lossy“, “standard” and “aggressive” for images.
Step 3:
The option “lossless” should be your go-to option which reduces the image size but preserves the quality!
Step 4:
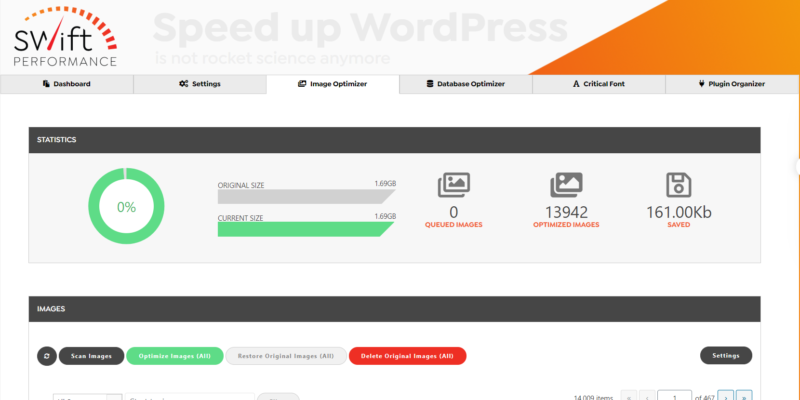
After you chose the compression level, go ahead and bulk compress
your images.
Step 5:
The free versions of Imagify, ShortPixel, or Smush will just give you a certain amount of “credits” per month which you can use to compress your images.
After that, you either wait for another month or pay their fee.
If you are looking for an all-in-one plugin that includes caching, image optimization, database cleanup, font hosting, and plugin organizer – you should definitely consider going for Swift Performance.
This is what the settings overview for images looks like at Swift Performance:
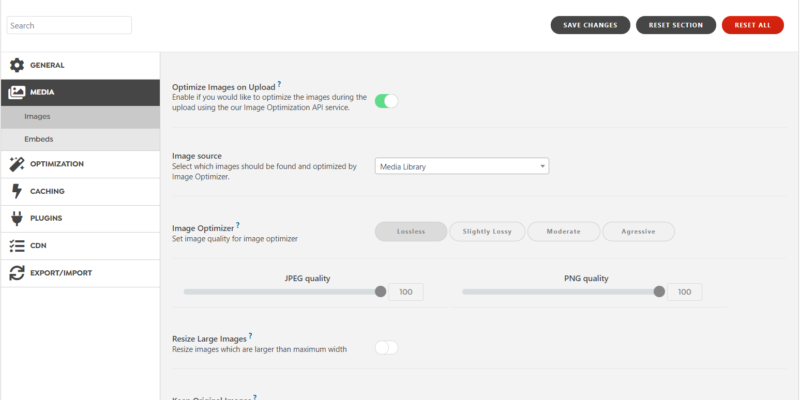
If you follow the instructions you should be able to improve your site speed and loading times!
3.4. Serve Images As WebP
What is WebP?
WebP is a modern image format that provides superior lossless and lossy compression for images on the web. Using WebP, webmasters and web developers can create smaller, richer images that make the web faster.
WebP lossless images are 26% smaller in size compared to PNGs. WebP lossy images are 25-34% smaller than comparable JPEG images at equivalent SSIM quality index.
Lossless WebP supports transparency (also known as alpha channel) at a cost of just 22% additional bytes. For cases when lossy RGB compression is acceptable, lossy WebP also supports transparency, typically providing 3× smaller file sizes compared to PNG.
Source: Google Dev
3.4.1 How do you serve webP images?
My suggestion: avoid all the free plugins or tools and just invest in something that will pay off in the long run.
For me, it was Swift Performance.
Here you see that with a few clicks, you can serve all your images on the website in a WebP format.
Let us know if those settings helped you to improve your website speed.
If you have any questions – drop them in the comments!
Why do we use Swift Performance:
(Review)
- Great & easy to use Setup-Wizard (recommended for beginners)
- Offers advanced caching features
- Cache Preloading
- Database Optimization
- Image Optimization
- GZIP compression
- Five-star reviews
- Multisite Compatibility
Affiliate Disclaimer:
If you are interested in purchasing Swift Performance, we would appreciate it, if you would sign up over our provided link which will allow me to create more beginner-friendly tutorials like these.
Recent Comments