You built your own website and filled it with good content?
But somehow your site is loading slowly and you have complaints about a bad user experience?
Follow the 5 Simple Ways to Improve Website Speed guide to fix that.
There’re could be several reasons for that and you are about to learn how to identify and fix them in the following guide.
5 Simple Ways to Improve Website Speed

1. The importance of site-speed
Let’s face it – we’ve gotten spoiled.
With modern technology at our fingertips, patience is growing thin – we want to get everything RIGHT AWAY.
No matter if it’s information, pictures, or videos.
Nobody wants to spend their time waiting for a site or video to load forever, especially now when the time has become so invaluable.
In general, one can say that websites that load fast perform better all around: they deliver a better user experience, have higher engagement, and have better conversion rates.
On top of that, Google has added page load speed to its ranking algorithms which will impact your SEO (Search Engine Optimization) ranking.
SEO is the process of optimizing your website to gain organic or un-paid traffic from the search engine results page.
In other words, SEO helps you to rank your website higher in the search results on Google for specific keywords.
The higher your site appears on Google, the more traffic you’ll gain.
2. How do you measure your website speed
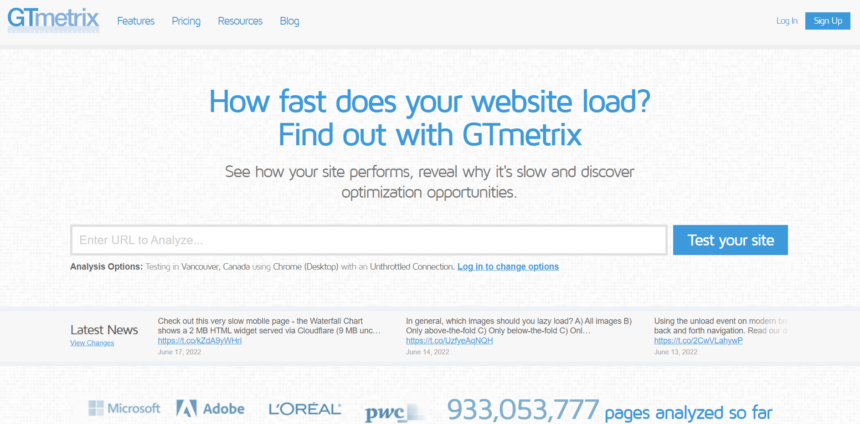
First, let’s understand what constitutes page speed, according to GTmetrix:
What is page speed?
The speed of a page is made up of both Front-end and Server-side components. While your front-end structure may be speedy, the generation of your page (the server-side) also plays an important role in page load times.
As you might already know, GTmetrix is one of the tools that test your page speed and get detailed feedback on what needs to be improved.
Here are three different tools that will give you insights into your site speed:
1. GTmetrix – gives you a detailed list of optimization suggestions that can help you improve your page speed. It was of great use for us to speed up Workoutfrolic and to generally gain tons of insights.
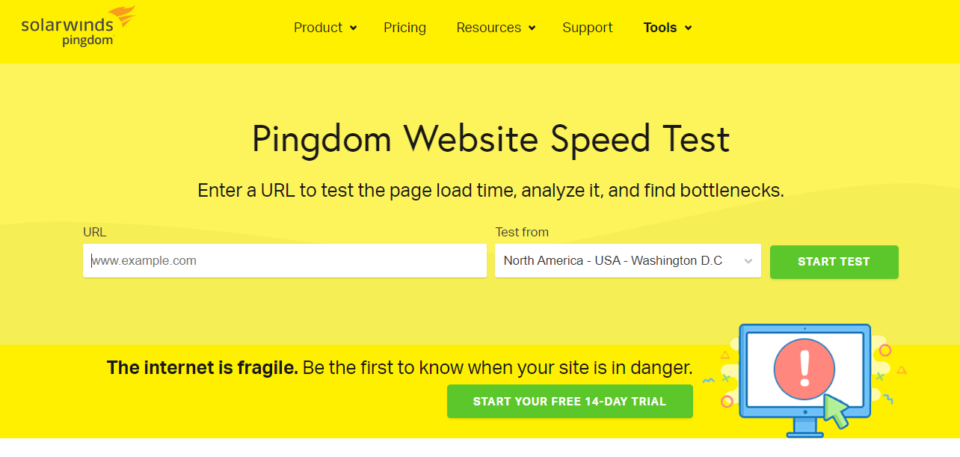
2. Pingdom – according to WP Rocket – is the most accurate tool to measure your page loading times. Generally speaking, your loading times are of greater priority rather than the grades. Regardless, by improving one, you’ll most likely improve the other as well.
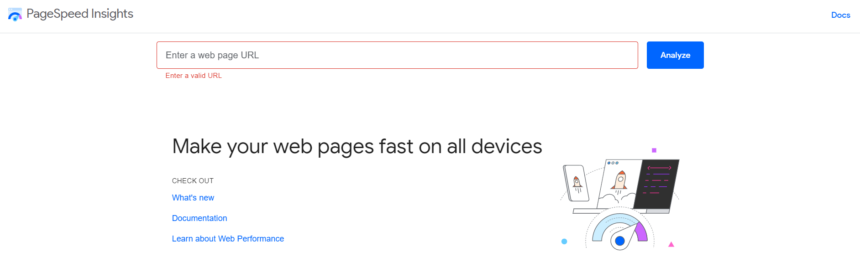
3. Google PageSpeed Insights – another good tool to analyze your page speed and get an overview of the newly introduced Core Web Vitals which play an important factor in your Google ranking.
3. How To Optimize Your Website In 5 Simple Steps
3.1 Hosting Your Website
3.1.1 EIG – HostGator, BlueHost, etc.
Now that you’re aware of how important site speed is, let’s turn our attention to one of the main factors that influence it – hosting.
Be aware of hosting providers offered by EIG
(Endurance International Group).
They own all “popular” hosting providers like BlueHost, HostGator, DomainHost, iPage, etc., and are known to cut their costs by putting too many domains on the same server. This causes delays, slow response times, or even downtimes of websites.

Take a look at these Reddit threads:
That will give you a clearer understanding of why they have such a bad reputation and why it’s better to avoid them.
If your goal is to set up a blog just to learn & use it for private purposes, then one of the hosting solutions offered by EIG might be the right fit for you, since they are generally pretty cheap.
If your goal is to create a blog, monetize it and start a business around it, there are better options out there that will give you the results now and in the future.
3.1.2 Cloudways
Cloudways offers fully managed cloud hosting that allows you to scale your hosting resources as you grow.
They have a great infrastructure optimized for speed, performance, and security
Like many before us, we went ahead and switched our hosting from HostGator to Cloudways.
The Digital Ocean Servers for $10 a month was the initial choice for us.
We had a short consultation with Cloudways customer service just to make sure the plan will suffice our needs.
Turns out, that the $12/month plan is sufficient for websites with 30-70k monthly views.
On top of that, you can host as many websites as you wish within these parameters on one server.
As we’re now pushing the upper end of it, we might need to upgrade soon.

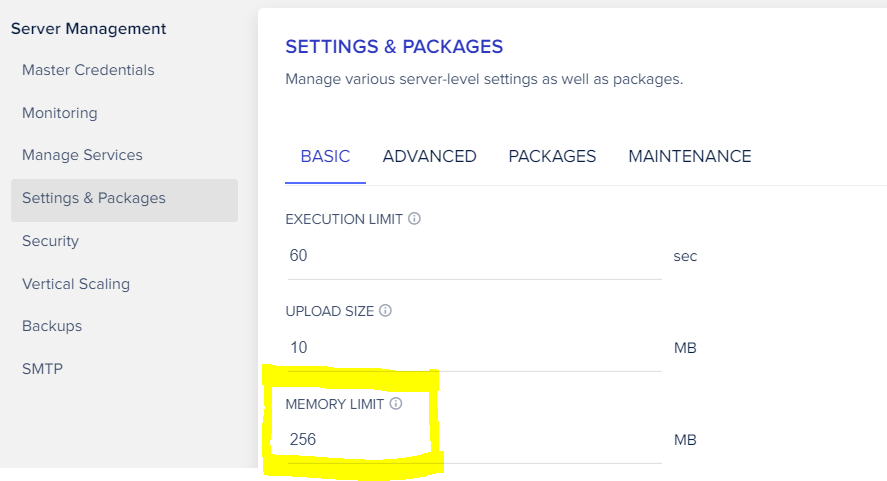
After setting up a server on Cloudways which just takes about 5min, I did some minor adjustments to ensure that we get the best performance of our server on Cloudways:
Step 1)
- Go to Server Management,
- Click on Settings & Packages and
- Adjust the Memory Limit to 256MB.
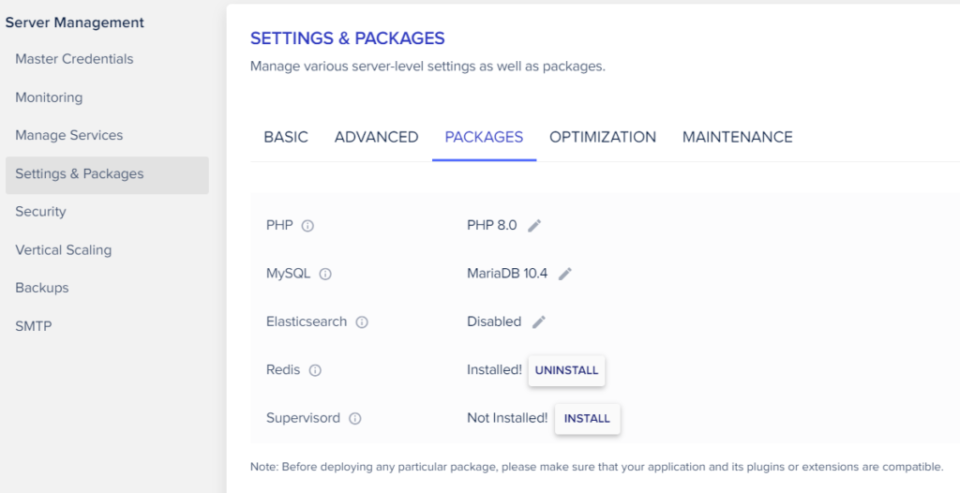
Step 2)
- Go to Packages in the menu and update the following:
- PHP to PHP 8.0 (Update available in 2021)
- MySQL to MariaDB 10.4 (Update available in 2021)
- Install Redis
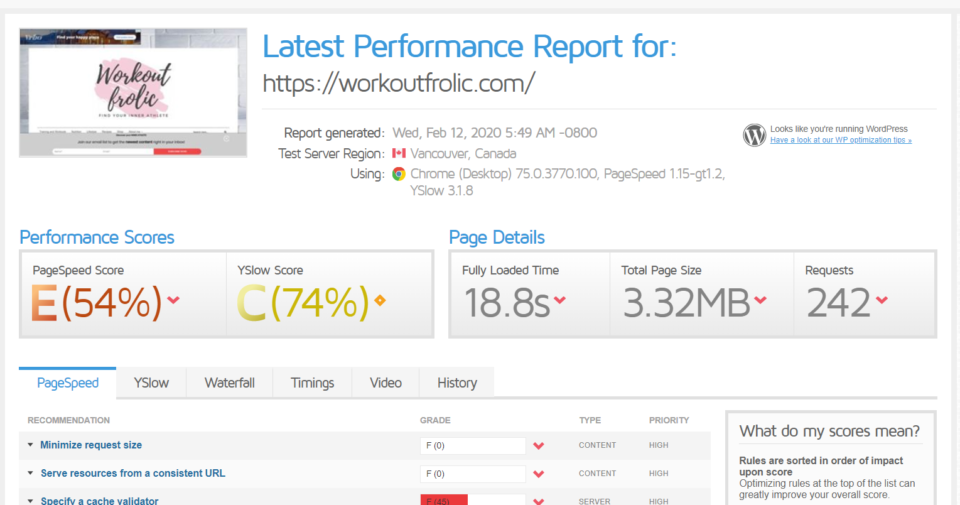
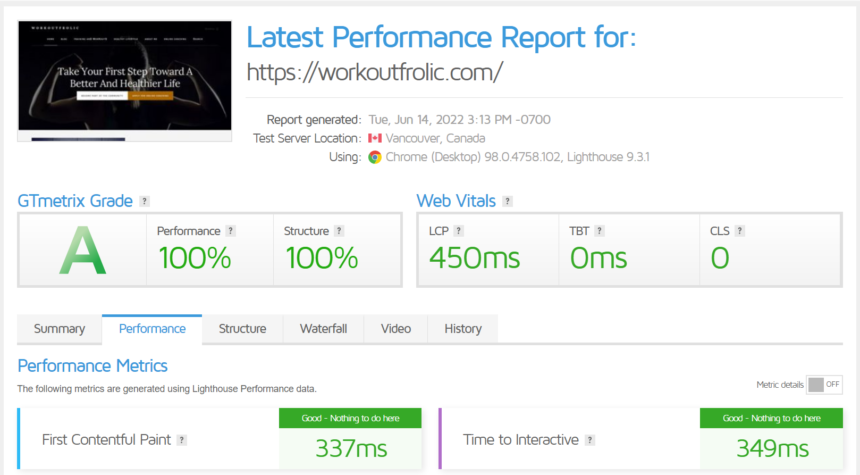
After we successfully migrated our website to Cloudways, the results blew us away.
Look for yourself.
GTmetrix score with HostGator
GTmetrix score with Cloudways
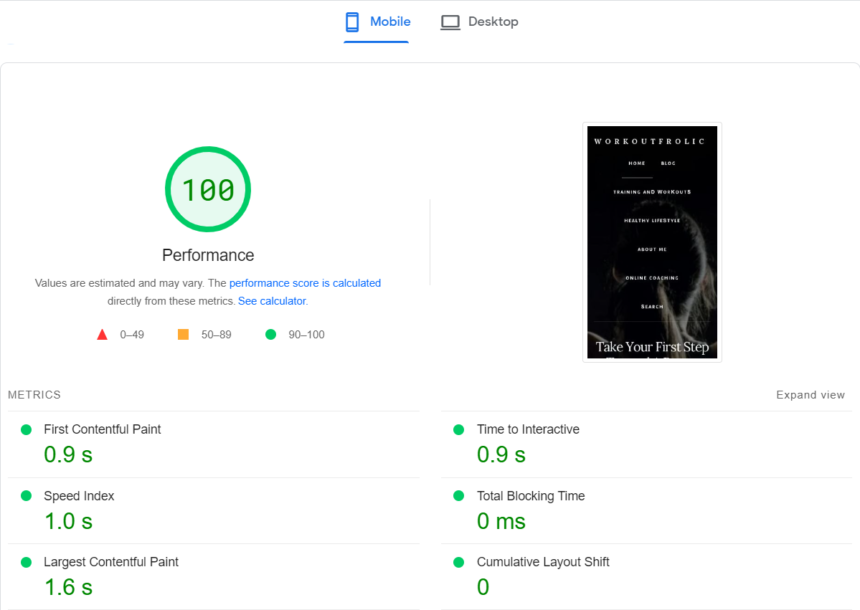
Google Page Speed Insights for Mobile with Cloudways
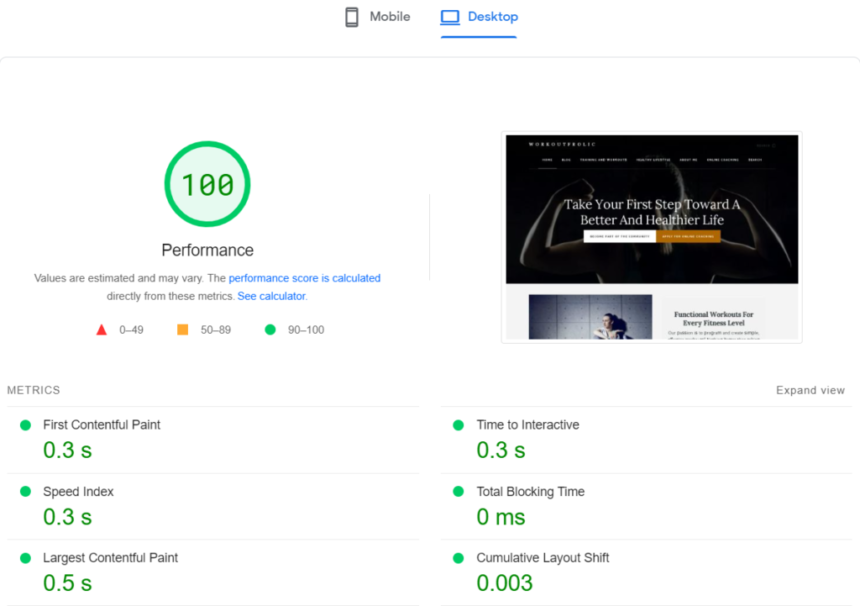
Google Page Speed for Desktop at Cloudways
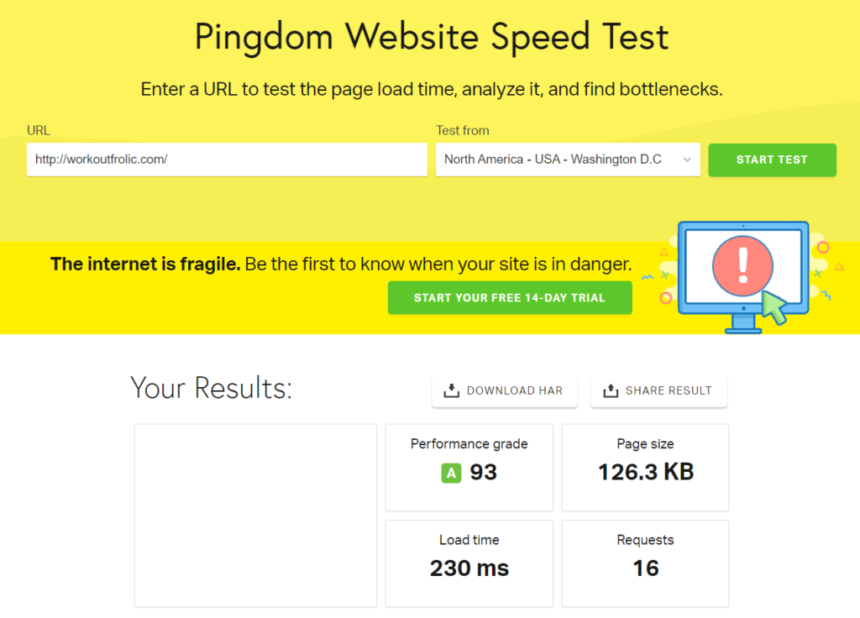
Pingdom with Cloudways
Seeing these results for the first time got us really excited!
It’s a great feeling knowing that your site’s performance is on top and your users are having an improved user experience.
We migrated our blog using their WordPress plugin and had zero hick-ups.
It seems like the only negative feedback that Cloudways gets is for their customer support.
To us, it seemed like they’ve worked hard to improve on that front, and personally, couldn’t be happier with it.
We were able to fix any issues within minutes and their customer service agents were very polite and helpful.
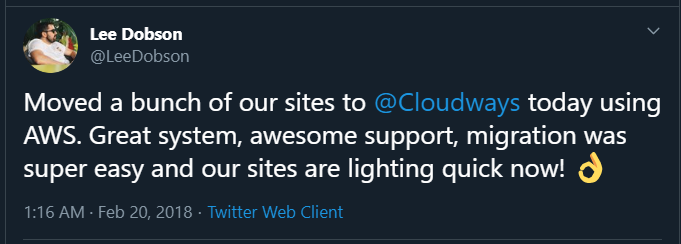
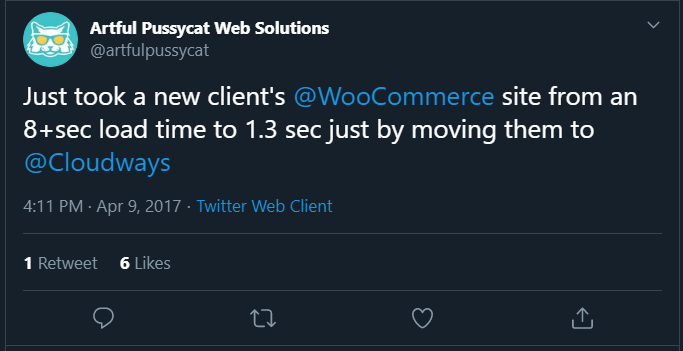
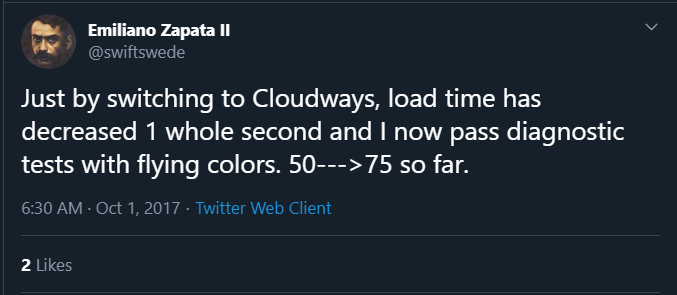
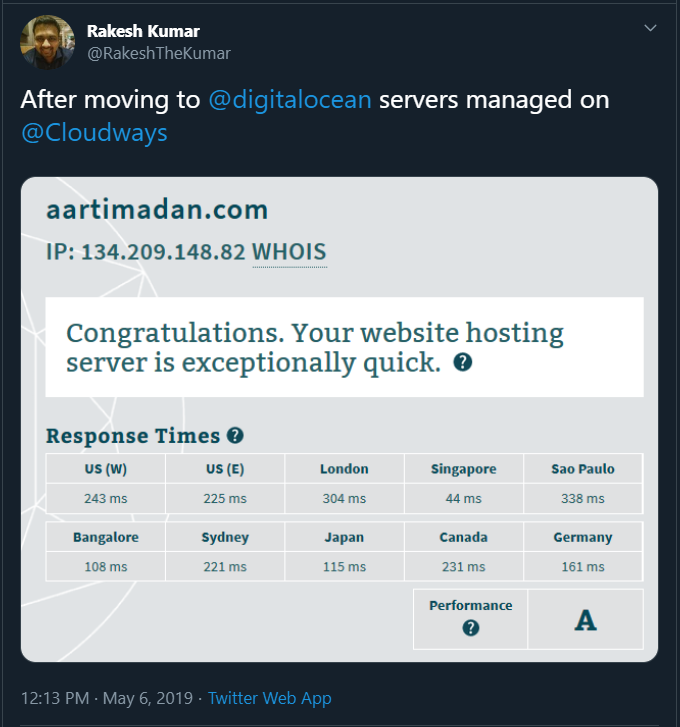
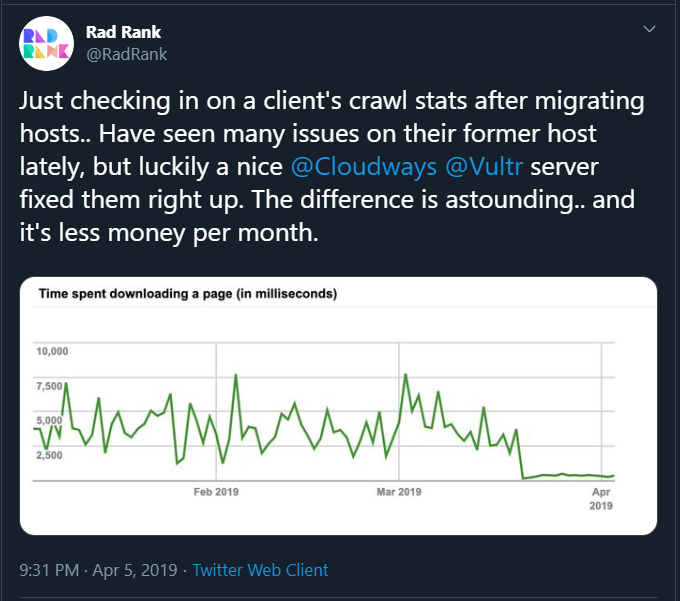
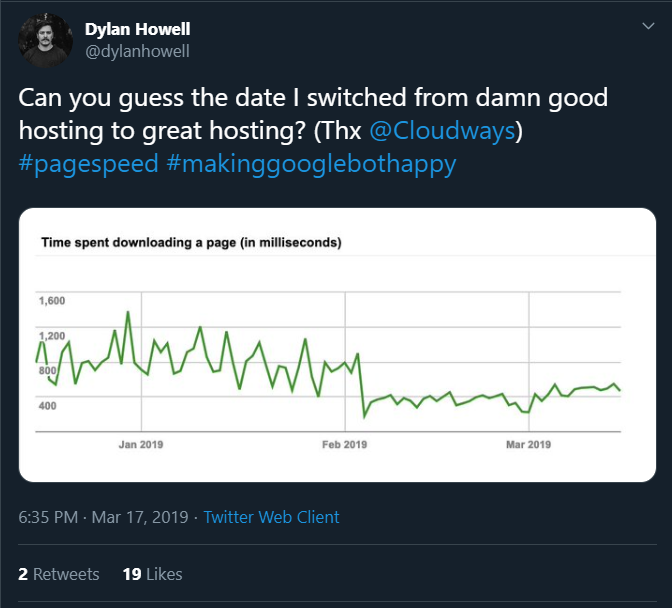
But don’t just take our word for it:
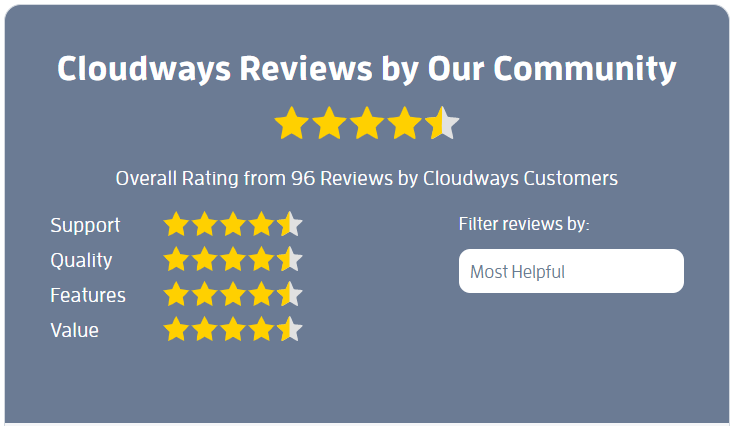
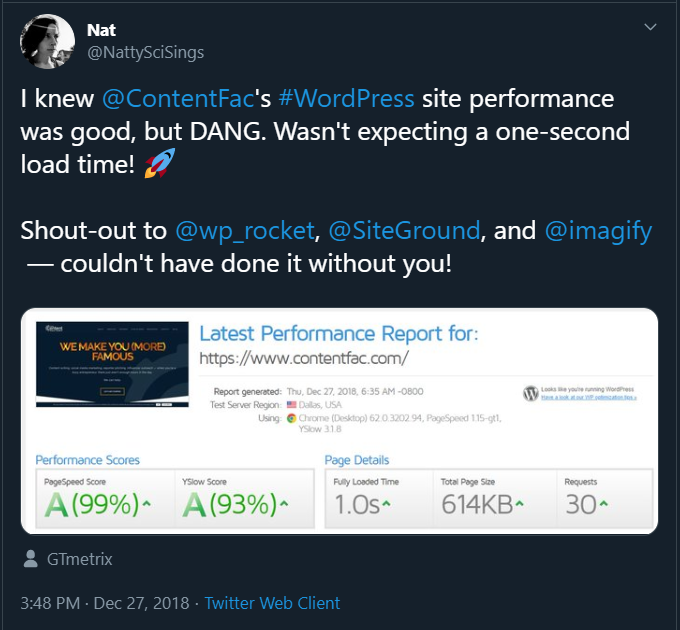
What people are saying…
Why we like Cloudways:
- Our GTmetrix, Pingdom, and Google Page Speed Scores shown above improved immensely and speak for themselves;
- Even though we use a lot of images & gifs, our page loads instantly;
- Supports PHP 8.0 (unlike HostGator which offers only 7.1 for shared web hosting), MariaDB 10.4 for MySQL, Cloudflare;
- Comes with its own caching plugin called “Breeze” which covers all your basic needs;
- Offer a free migration that you can request, as well as a migration plugin that is easy to use (we did our migration using the plugin);
- Based on our experience – great customer service;
- Free Let’s Encrypt SSL is included;
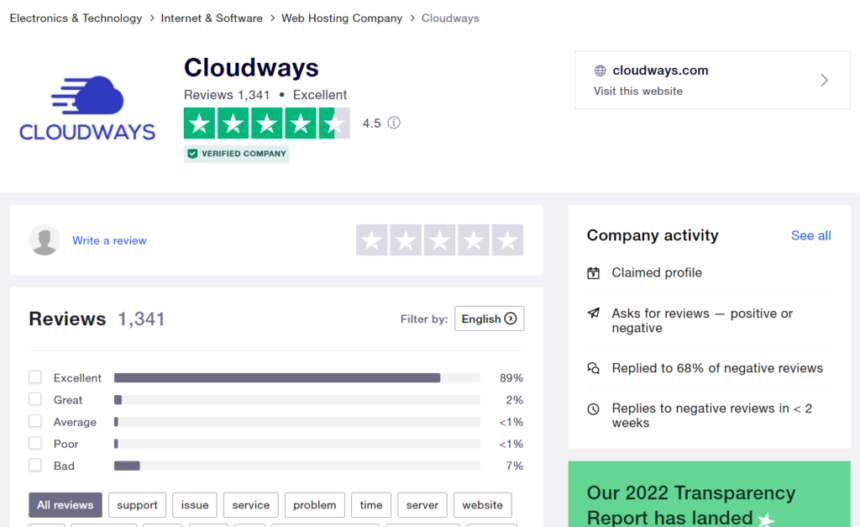
- Have great reviews 1, 2, 3 and 4
Affiliate Disclaimer:
If you want to switch to Cloudways, we would appreciate it, if you would sign up over our provided links which will enable us to create more beginner-friendly tutorials like these ones.
3.1.3. Siteground
Another great provider that we recommend is Siteground.
Next to Cloudways, it’s one of the most praised hosting solutions out there.
Siteground is also recommended by WordPress.
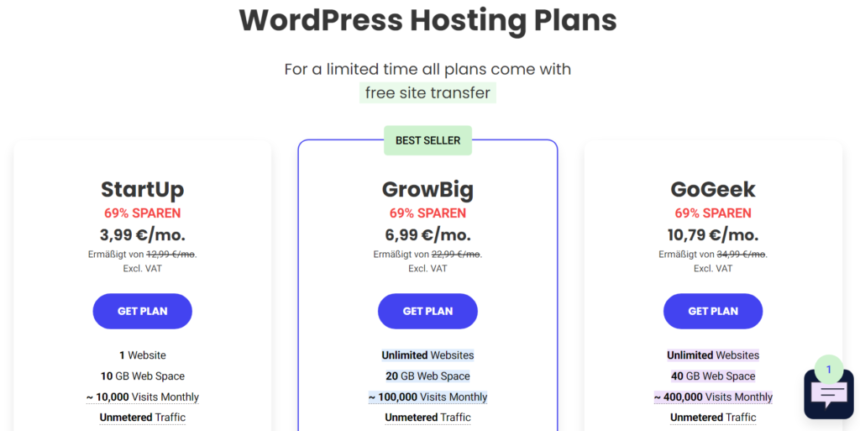
Choose a plan based on what your needs are.
The “StartUp” plan is the obvious option if you only need hosting for one site.
If you plan on adding more websites and looking to grow a business, you should definitely take a look at their other plans and if you have any questions – consult with their customer service.
More details on how to start a blog and set it up with Siteground from the start here.
Despite Siteground’s impressive reviews and reputation, we felt like it wasn’t quite the right solution for us.
We felt tempted by the flexibility that Cloudways provides and knew that we would probably outgrow our plan quickly.
For that reason, we wanted to stay with a plan where we could pay monthly, rather than commit to a 2-3-year-plan.
See, the way how most hosting providers work is that you need to pay at least a year ahead.
Since the initial prices are so much cheaper than the renewal prices, it makes sense to take advantage and get the longest plan possible.
In the end – you have to choose for yourself which hosting provider you feel more comfortable with and how much money you are willing to spend.
We are not trying to take anything away from Siteground.
According to many reviews & Facebook polls – it is one of the most popular solutions and offers you reliable & fast servers.
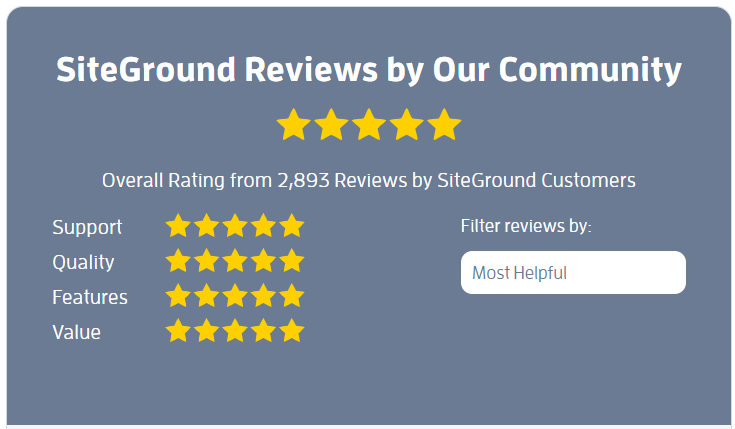
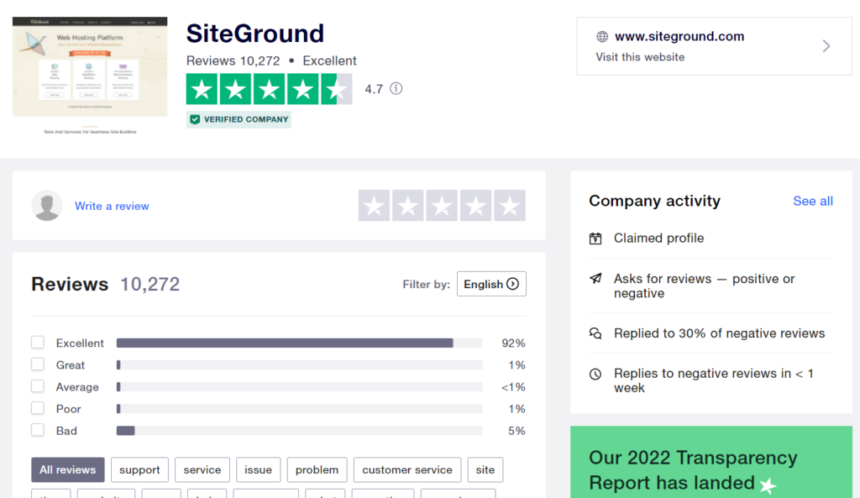
What people are saying…

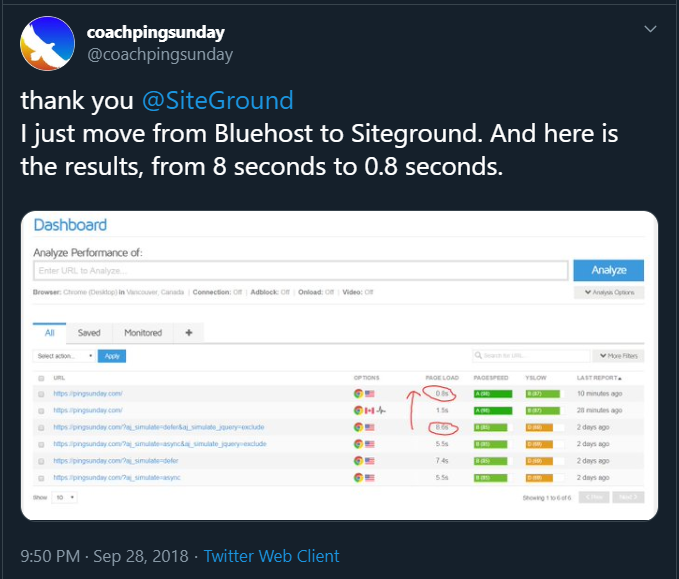
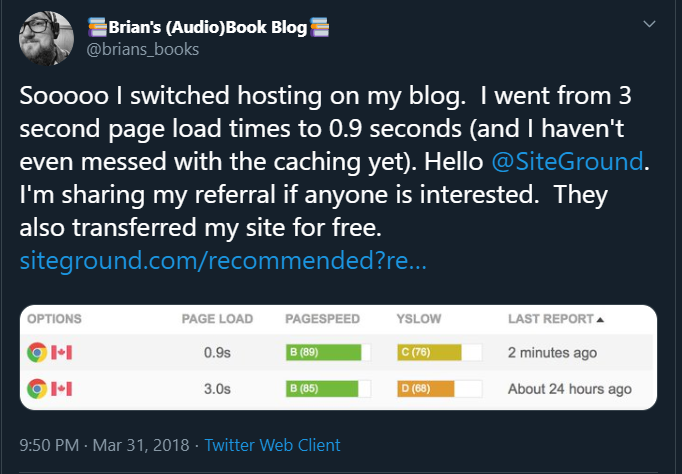
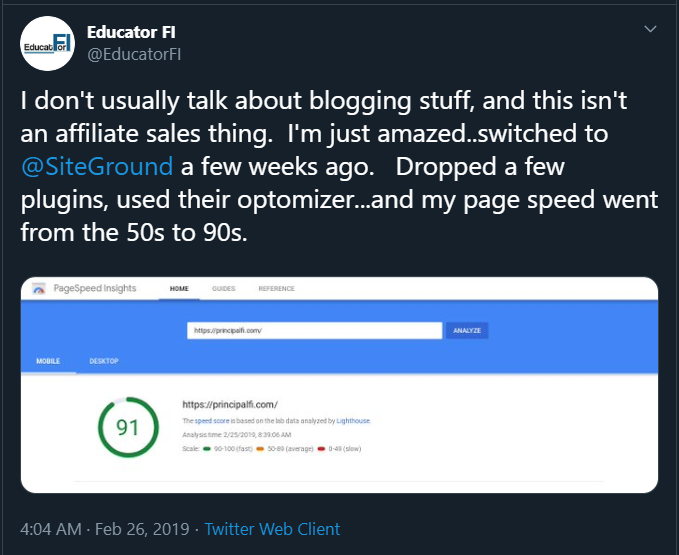
Why do we recommend Siteground: (review)
- Great site performance (speed & uptime) due to superior technology;
- They are a support/customer-orientated company;
- Five server locations;
- Free site migration;
- Amazing support;
- Optimized for WordPress;
- Five-star reviews;
- They are endorsed by the most popular SEO WordPress Plugin – YOAST
Affiliate Disclaimer:
If you want to switch to Siteground, we would appreciate it, if you would sign up over our provided link which will enable us to create more beginner-friendly tutorials like these ones.
4. Upgrade your PHP version
4.1 What is PHP?
PHP is one of the most popular scripting languages on the web.
In fact, 70% of all websites that use server-side programming use PHP. That’s 8 out of 10 sites.
4.2 What PHP versions exist?
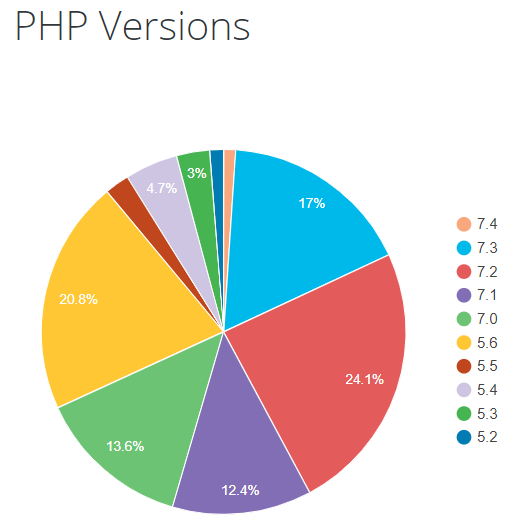
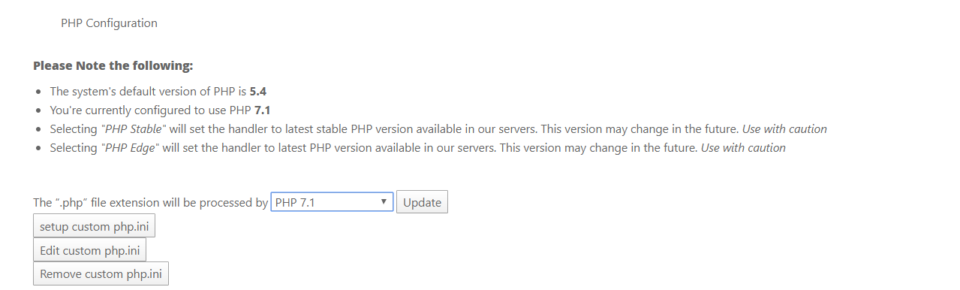
Updating your PHP version to a 7+ to 8 version from a standard 5.4 or 5.6 version will automatically make your website faster.
Why do we say 7+ to 8 version?
It actually varies from hosting provider to hosting provider what type of PHP will be offered.
Our old hosting provider HostGator only supported PHP 7.1. for shared hosting and our new hosting provider, Cloudways is supporting PHP 8.0
Unfortunately, hosting solutions don’t update your PHP version on their own.
This is mostly due to compatibility issues with themes & plugins and they want to avoid breaking your pages.
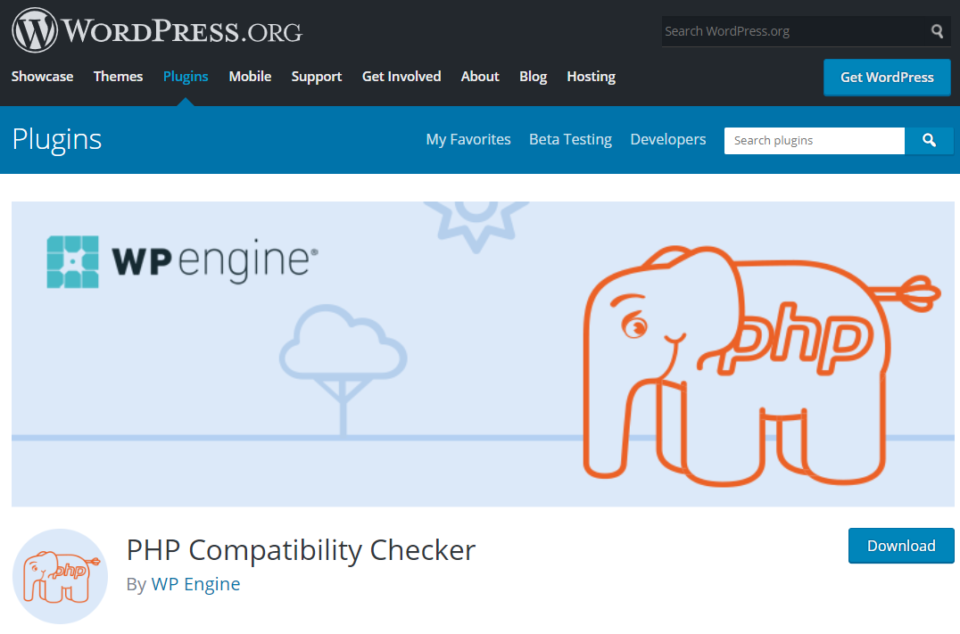
The best way to identify if a PHP upgrade will cause any issues is to install a plugin called PHP Compatibility Checker.
If you don’t know what PHP version your page has, install the plugin Display PHP Version.

4.3 But how can I update my PHP version?
Example: HostGator
Step 1:
Go to the cPanel of your hosting. (usually, you need to log in at your hosting’s website)
Step 2:
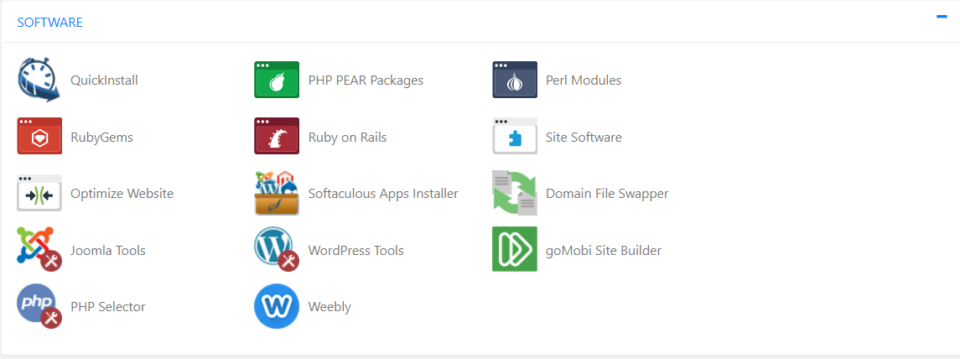
Browse through your cPanel until you find the option where you can access and change your PHP version.
In HostGator, it was called the “PHP Selector”.

Step 3:
Go ahead and update to the highest PHP version available after you did the compatibility check.
5. A great chache plugin is a must
There are many caching plugins out there and most of them offer some features for “free“.
Just to name a few good ones – WP Rocket (paid), Swift Performance (free & paid), WP Fastest Cache, W3 Total Cache & WP Super Cache.


Talking from experience – it’s really hard to determine which plugin is the ultimate “best” for your website.
One plugin can deliver different results on different websites.
My suggestion is just to try it out for yourself. It is a lot of effort but it will definitely pay back.
No matter which plugin you choose, here are some of the basic settings that you need to consider: source – GTmetrix
- Cache System
- It is quite obvious but after downloading the plugin, you actually need to enable caching for faster delivery of pages.
- Preload
- This is a very useful function that can be adjusted to your needs. Basically pre-loading (or pre-caching) the pages of your website for a faster experience for the user.
- You may need to reduce this number of preloaded sites if your hosting service complains and creates issues for you.
- Don’t show Cache for Logged-in Users
- This feature ensures that if you’ve logged in, you see the actual state of your pages, not the cached versions. This will allow you to see the changes you’re making instantly.
- Minify HTML
- This will compress HTML and reduces file sizes.
- Minify CSS
- This will compress CSS and reduces file size, as well.
- Combine CSS
- This will join your CSS files into a single CSS resource, reducing the number of HTTP requests instead of loading each CSS file separately.
- Combine JS
- This will join your JavaScript files into a single JS resource, reducing the number of HTTP requests instead of loading each JS script separately.
- Gzip
- This feature will further compress your pages to be smaller in file size and enables faster loading times.
- Browser Caching
Note: when you minify and combine HTML, CSS & Javascript – it can actually happen that it breaks the functionality of your website.
Because of that, you should be careful when you are using cache plugins.
A way to avoid problems is to have a backup or have a “preview” mode that cache plugins like “Swift Performance” are offering.
To understand what is actually happening during the Minification & Combination process here is a short description.

Don’t forget:
Whenever you make major changes to the site, like adding a plugin, or modifying the theme or CSS files, it’s recommended to delete the cache and preload it again to ensure you’re serving the latest version of the site.
5.1. SWIFT Performance
Our go-to cache plugin is the paid version of Swift Performance. We had a longer trial run with the Lite version and after seeing positive results to our site speed, we went ahead and purchased the full version.
Features
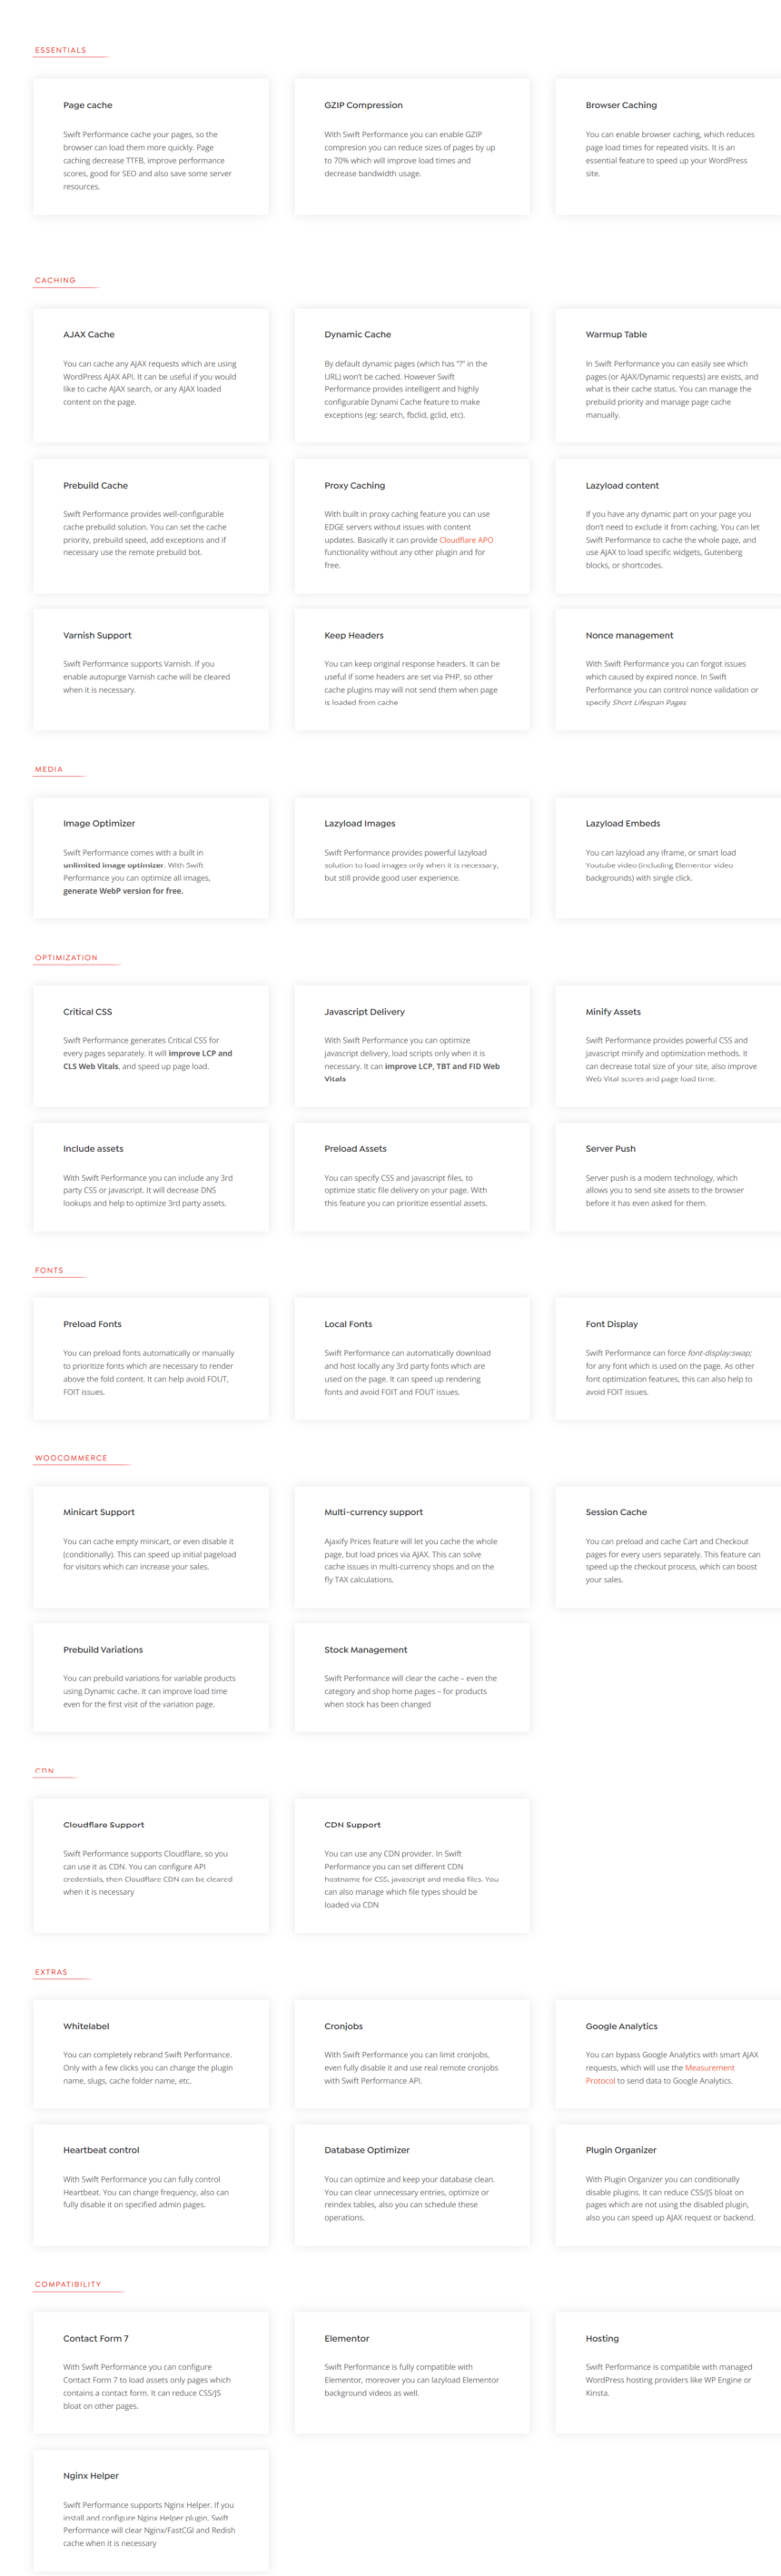
Is it beginners friendly?
Even if you are completely new to blogging and don’t have any technical background, Swift Performance makes the set-up extremely easy.
Their “Setup Wizard” will navigate you through all the settings and help you with all the necessary features.
Why do we use Swift Performance:
(full review)
- Great & easy to use Setup-Wizard (recommended for beginners);
- Offers advanced caching features;
- Cache Preloading;
- Database Optimization;
- Image Optimization;
- GZIP compression;
- Five-star reviews;
- Multisite Compatibility
Affiliate Disclaimer:
If you are interested in purchasing Swift Performance, we would appreciate it, if you would sign up over our provided link which will enable us to create more beginner-friendly tutorials like these.
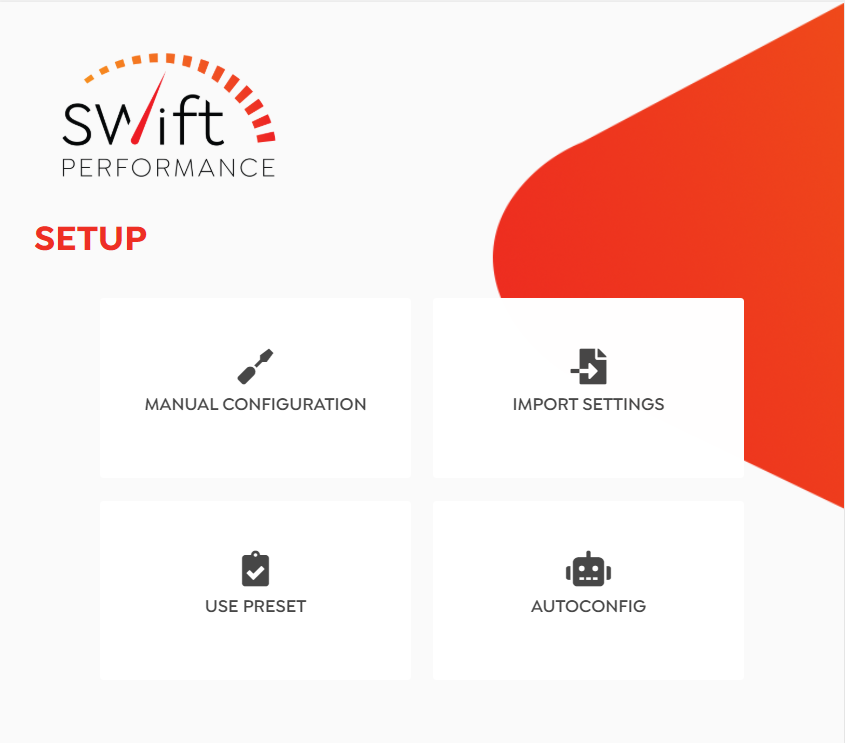
5.2. Database Cleanup
What’s happening during a database cleanup?
- You are usually deleting all your spam & trash folders similar to when you delete files on your laptop.
- The cleanup includes the deletion of trackbacks, pingbacks, database tables, transients, and post revisions as well as post drafts.
- Post revision & drafts are automatically stored by WordPress when you create new blog posts.
- All of these files are unnecessary and just slow down your site.
We recommend using: Swift Performance, WP Rocket, or WP-Optimize.
Note: always take a backup of your site when you are doing the Database cleanup for the first time.
6. Content Delivery Network (CDN)
6.1 What are the benefits of using a CDN?
CDN providers have servers located around the world and enable them to cache resources (e.g. your website) throughout the world.
This allows users who are requesting your page from another region than the originating one, to have a fast page load by being closer to an edge server of the CDN.
Cloudflare is a popular option due to a free plan that covers all the basic needs.

6.2 Cloudflare Setup

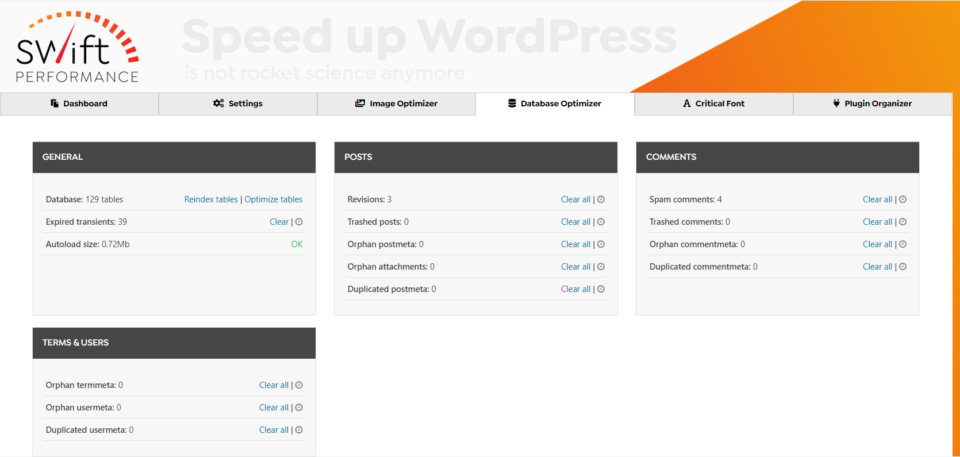
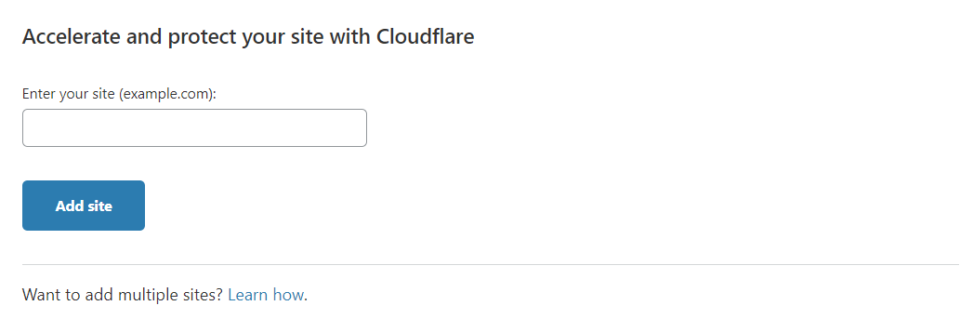
Step 1: Create an account on Cloudflare.
Step 2: Add your website.
Step 3: After adding your page successfully, Cloudflare will ask you to change the nameservers in your hosting or registrar to the nameservers of Cloudflare.
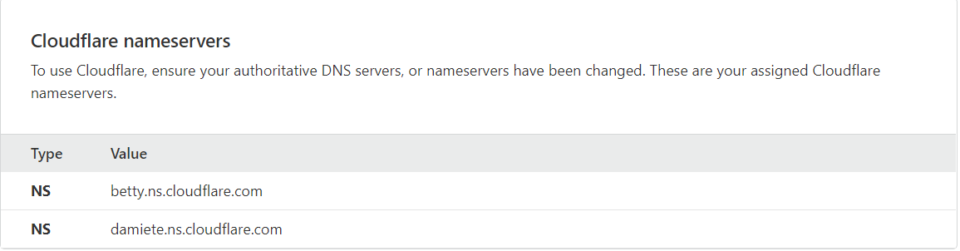
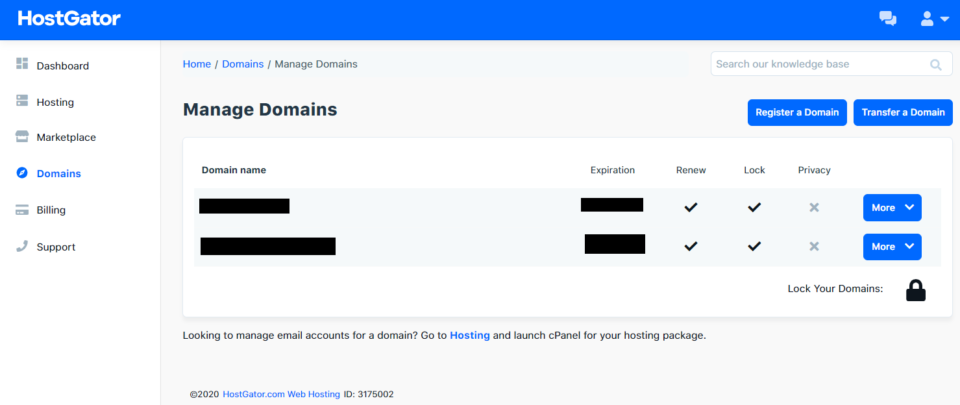
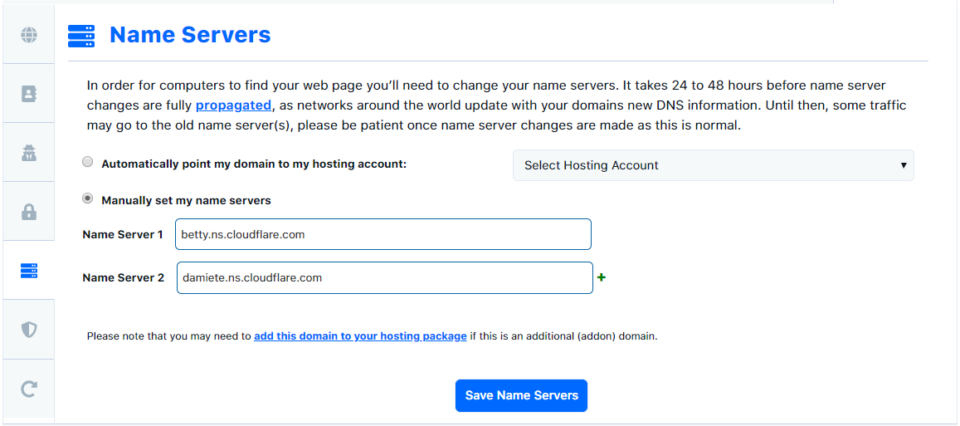
Step 4: Go to your hosting solution page or registrar and change the existing nameservers to Cloudflare’s nameservers.
Example from HostGator:
Usually, it takes some time until the changes are successfully done! Cloudflare will notify you about it in their Dashboard.
6.3 How to configure Cloudflare?
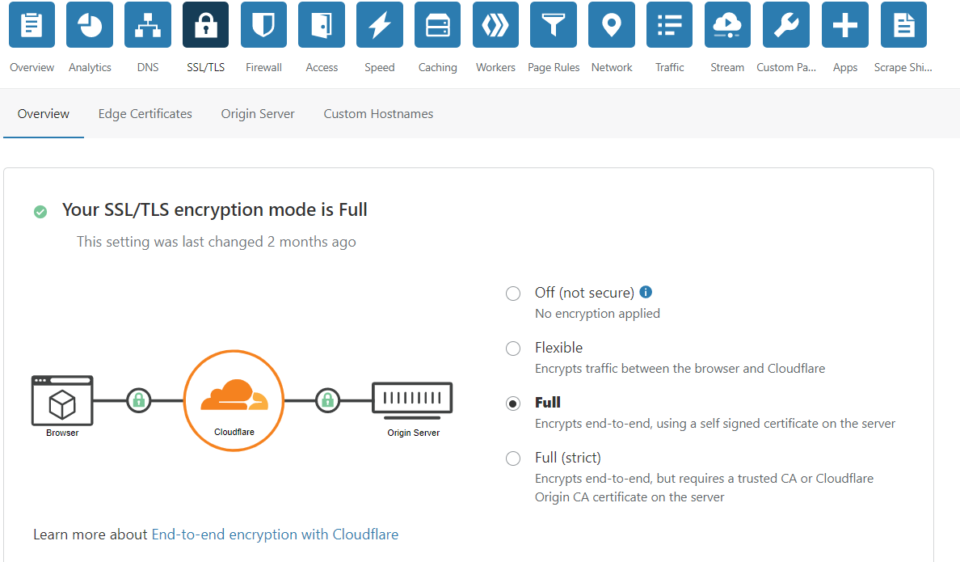
Step 1: In the “SSL/TLS” section choose the “Full” end-to-end encryption
to assure full security.
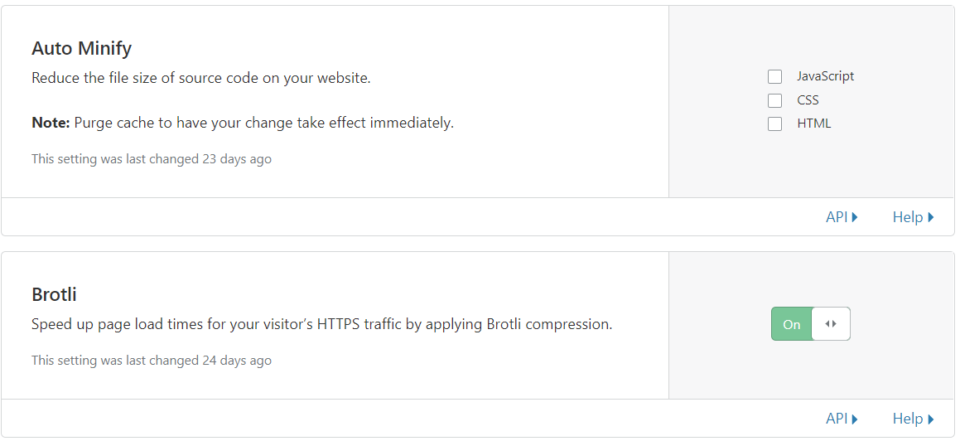
Step 2: In the “Speed” section you can choose options like “Auto Minify” (reduction of file size of your source code) which most of your cache plugins are already covering and you only need to use one of them!
“Brotli” is similar to the GZIP compression, just a little more efficient.

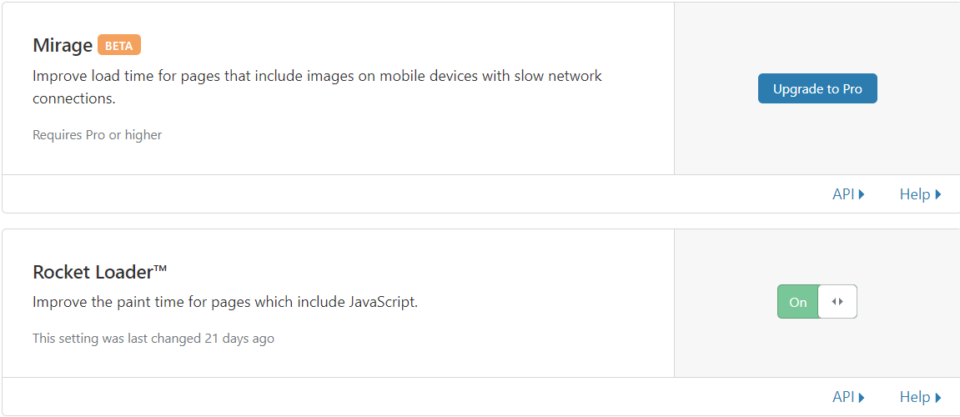
The “Rocket Loader” defers the loading of Javascript.
Again a function similar to what Cache plugins are offering.
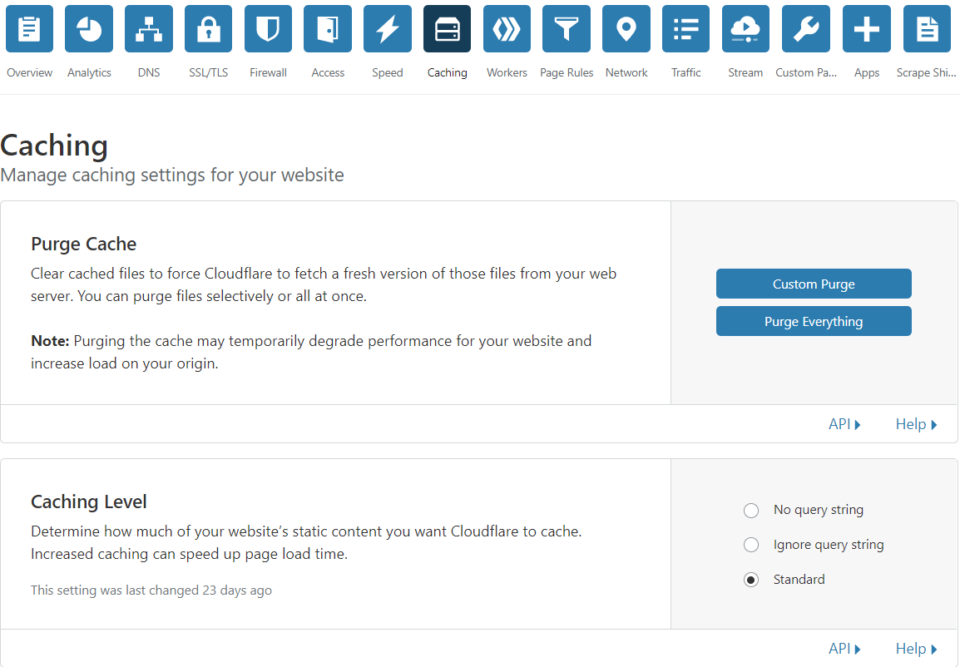
Step 3: In the “Caching” section set the Caching Level to “Standard” which is the most aggressive caching of your page. Set your “Browser Cache TTL” to 2 months.

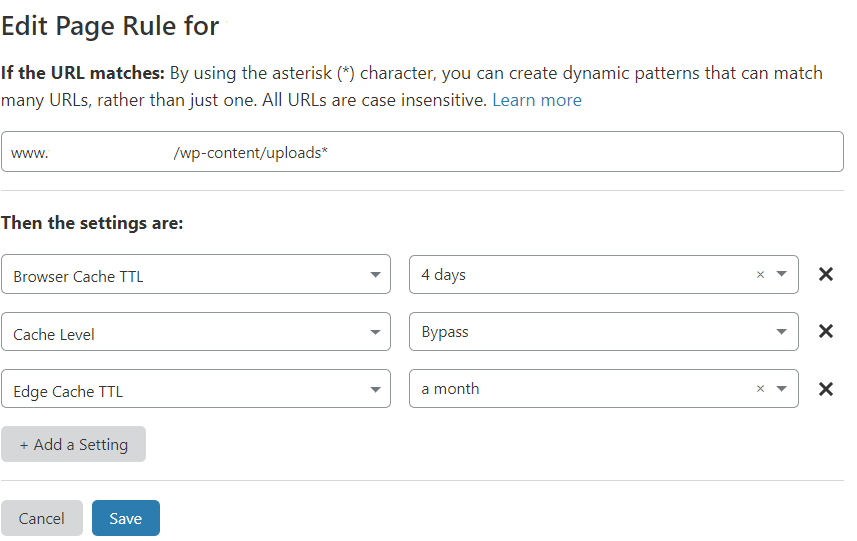
Step 4: Under the section “Page Rules” – Cloudflare allows you to set up three-page rules for free. Cloudflare suggests the following:
Page Rule 1:
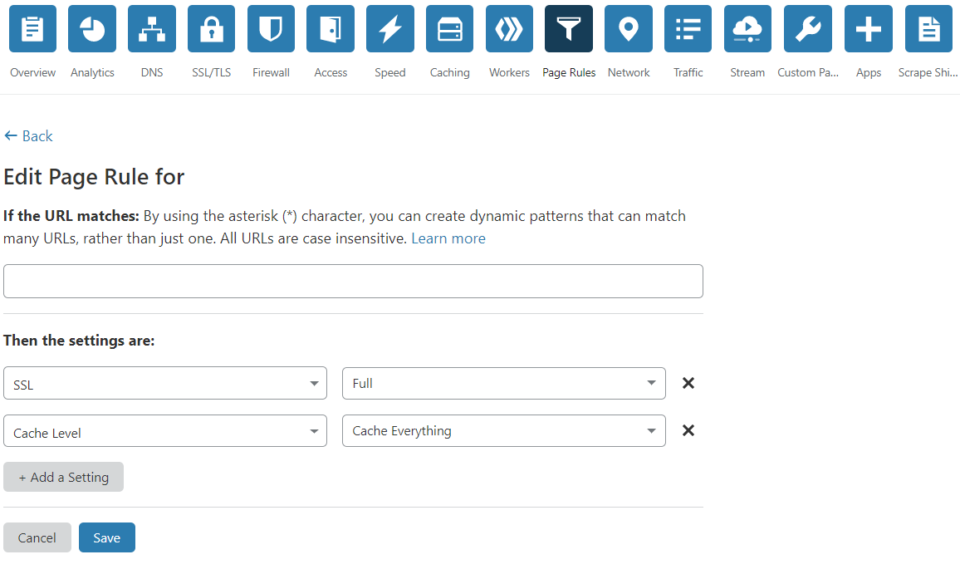
Page Rule 2:
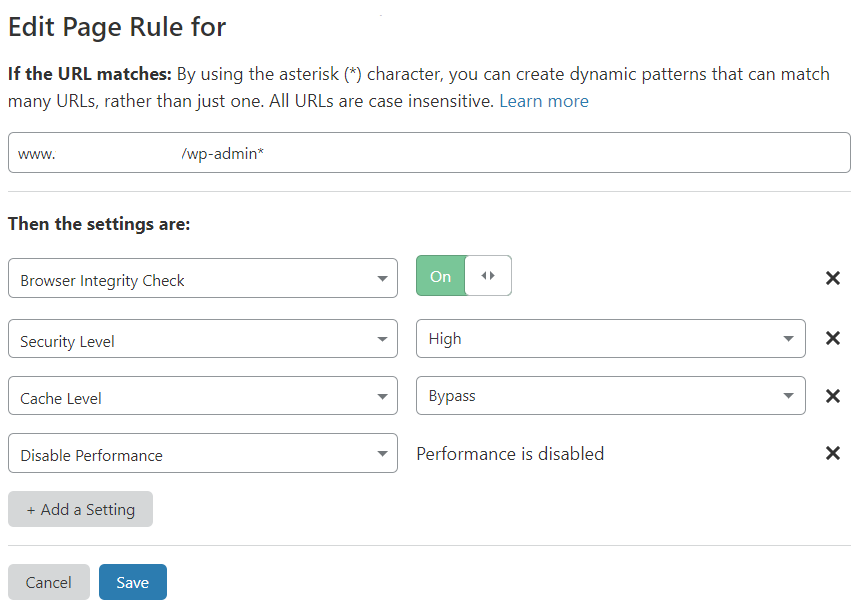
Page Rule 3:
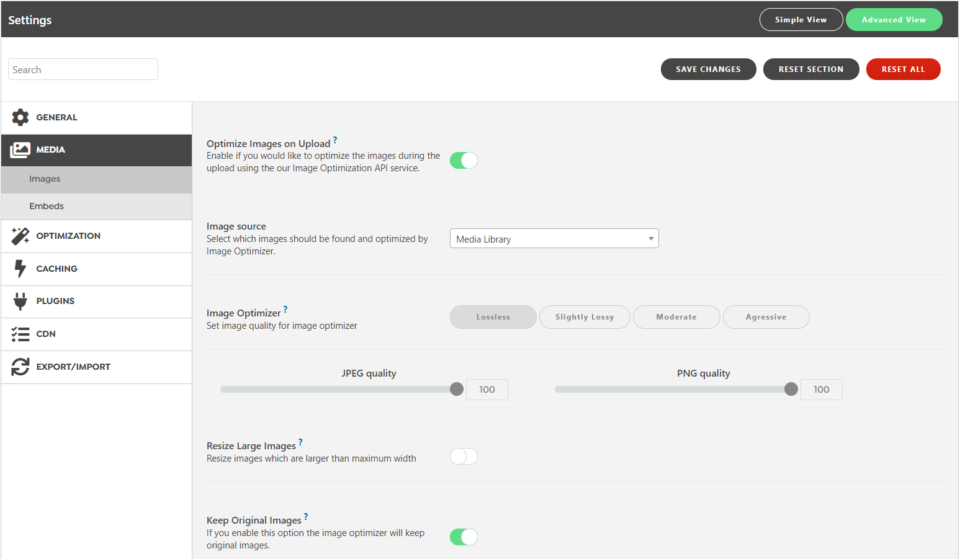
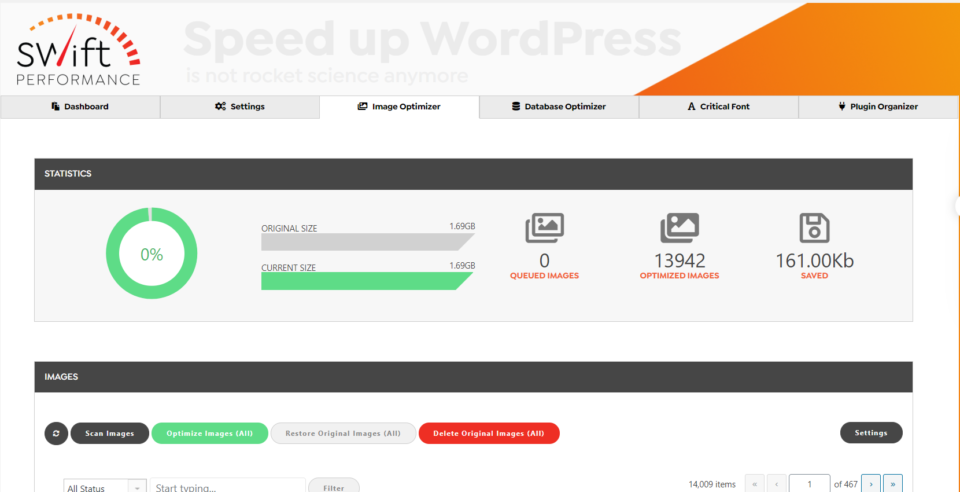
7. Image Optimization
Lastly, you need to optimize both the images that are already in your media library, as well as the ones you plan to upload.
If you are using a lot of different graphics and pictures, this will be a game-changer for page speed.
To optimize your images you can use plugins like Imagify, ShortPixel, or Smush which are all free until you reach the monthly limit.
Another great option is as mentioned before, Swift Performance.
After installing any of the plugins mentioned above and following the initial instructions, this is what you need to do next:
- Step 1: The main setting that you want to adjust is the compression level of the images.
- Step 2: Swift Performance offers the options “lossless“, “slightly lossy“, “standard” and “aggressive” for images.
- Step 3: The option “lossless” should be your go-to option which reduces the image size but preserves the quality!
- Step 4: After you chose the compression level, go ahead and bulk compress your images.
- Step 5: The free versions of Imagify, ShortPixel or Smush will just give you a certain amount of “credits” per month which you can use to compress your images.
After that, you either wait for another month or pay their fee.
If you are looking for an amazing all-in-one plugin that includes caching, image optimization, database cleanup, font hosting, and plugin organizer – you should definitely consider going for Swift Performance.
You made it to the end! You deserve a prize!
If you follow these instructions you should be able to dramatically improve your site speed and loading times!
If you have any questions – drop them in the comments.
Recent Comments